
Google Analytics is a neat and nifty tool. If you have a website or app, using Google Analytics is not an option, but a necessity.
It can look a bit intimidating with all the options, tabs, buttons, data, lines, circles, and other pieces of information scattered across the dashboard. Setting up Google Analytics can look confusing, but it doesn’t have to be.
It’s a vital part of any website and is key to understanding your digital marketing or SEO efforts.
Today, we’re going to talk about how to set up Google Analytics quickly and easily to help you find immediate success.
What is Google Analytics?
Google Analytics is a free tool from Google that helps website owners, marketers, developers, analysts, and more look at audience data. Google Analytics can help tell you which pages on your site are the most visited, where your audience is coming from, demographic data, how long users are spending on your site, and much, much more.
If you have a website, you need to have Google Analytics set up. If you don’t, you’re missing out on valuable data and analytics that could help take your business to the next level.
Step 0: Check to See if You Have a Google Analytics Account
If you’re not sure you have a Google Analytics account, then you should check that immediately. There are a few ways to check.
The first is to go to your website, right-click, and select ‘view page source’. Or, simply press CTRL+U.
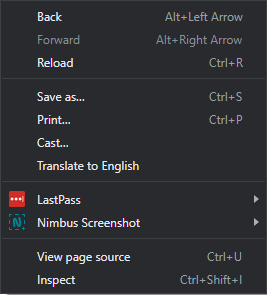
Here, you’ll be looking at all the code that makes up your website. From there, you’re going to want to press CTRL+F to search for text on the page.
Type in ‘UA-‘ as this is the start of any Google Analytics tracking code. The code will look like UA-00000000-0. If you have that code, then you’re already set up with Google Analytics and need to find the email address associated with tracking that account. You can skip Step 1.
If you don’t see that code, proceed to Step 1.
Step 1: Create a Google Analytics Account
Now that you’ve established you don’t have an account, it’s time to make one.
Start by going to the Google Analytics homepage where you’ll be asked to sign in. The prompts will walk you through the sign-up process which includes adding your tracking code, creating an account name, and putting in your site’s name.
**Right now, Google Analytics is pushing for you to sign up for the new Google Analytics 4. You can use the current dashboard by clicking ‘advanced’ when it prompts you to sign up. There, you can select the Universal Analytics account option.**
From there, you will see your tracking ID and instructions about what to do with a code snippet.
![]()
Don’t worry about the code too much. If you have a WordPress site, there are multiple plugins (like Monsters Insights) that will help you connect your site to Google Analytics in no time. For those that aren’t overly tech-savvy, this is a great tool to help you avoid having to mess around with the back-end of your site.
Perfect, now your site is connected to Google Analytics and you’re ready to start tracking data.
Accounts, Properties, and Views
After you complete the initial sign-up stage, you’ll be sent to the dashboard where you’ll be greeted by three columns. At the top of each column, you’ll see Account, Property, and View.

What is the difference between these three?
‘Account’ is just as it sounds. It’s where you registered your email and allows you to log in to Google Analytics. If you want to add more accounts to your email, you can have up to 100 accounts.
Property, on the other hand, is where you register your site. Perhaps your business has multiple websites or subdomains that you want to track. If you’re running ad campaigns, maybe you have landing pages you want to keep separate from your original website.
This is where you’ll also find any tracking information, such as your Analytics tracking code.
Under each account, you can have up to 100 properties.
The last column, view, is where you can set up different ways to view your account. You might want to filter certain queries or people with one view, block bots, have unique goals, and more. Under each property, you can have up to 25 views.
Step 2: Add Filters
You want to track data efficiently, but you want to make sure you’re tracking the right data. What do we mean by that?
If you or your coworkers visit your site, you don’t want to actively track that traffic. These visits aren’t going to be a potential lead and if you happen to navigate to a conversion page, that may mess up your data.
The easiest and best thing you can do is filter out your IP addresses for traffic purposes.
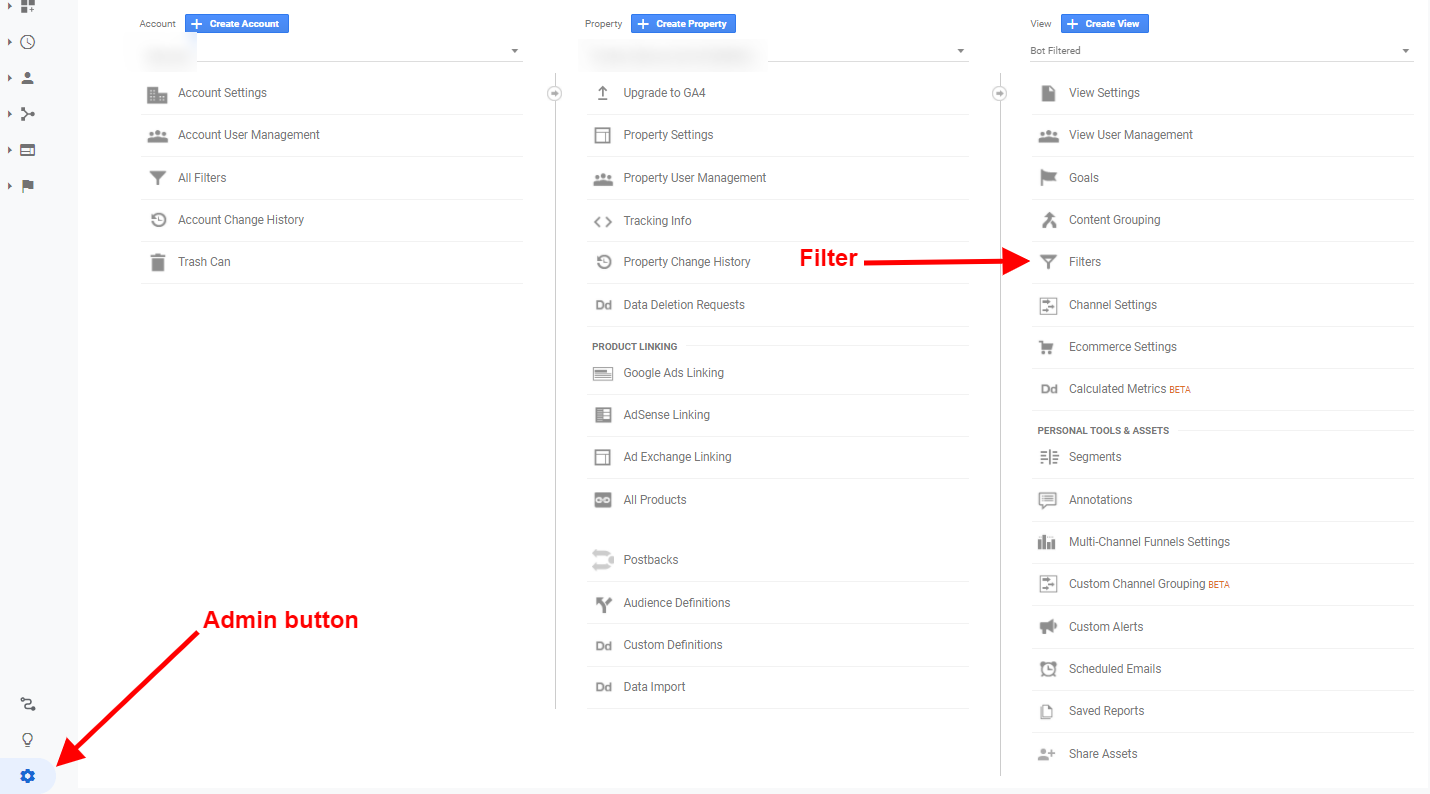
First, go to your admin panel. It’s the little cogwheel in the bottom left-hand corner. Next, click on the filters button on the right-most column.
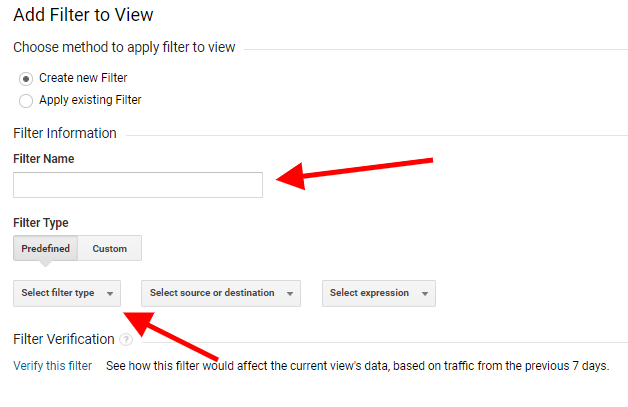
Once you click on the filter button, you can start to add filters to help maintain your traffic.
The easiest place to find IP filters is by using the following website.
From that point, it’s just simple copy and paste.
You’re also going to want to go back to that right column and click on View Settings. Here, you’re going to want to scroll down and select the option for Bot Filtering. This will filter out all known bots, from Google and other search engines, and filter them out of your traffic.
If you want, you can create a second view that only filters bots. This way, you can monitor any traffic spikes or dips on your site accordingly. You can see if traffic numbers are connected to bots or there is a larger issue on your site.
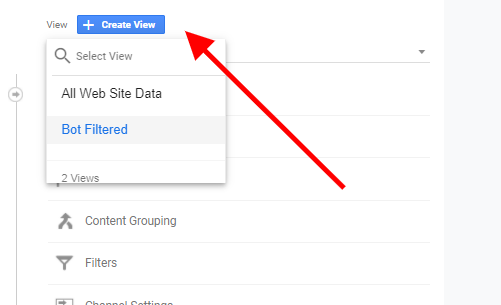
Here, you can alternate between the two views and make sure you’re analyzing data correctly.
If you’ve got a web and an app, you can also separate those views to see which is driving more traffic.
Be careful when you delete a view, however. Once the data is deleted, there is no way to recover it.
Step 3: Set Up Some Goals
On your website, you want to drive people to certain pages or encourage them to take specific actions. Perhaps you’re a car rental business and you want people to sign up for a free quote. Maybe you want them to push a certain button to go to your contact page.
Goals and events can vary greatly from business to business so deciding what they are is entirely up to you.
As you’ll see in the rightmost column, there is a button called “Goals”. Inside that button is an area where you can set up and design your own goals.
Inside each view, you can have up to a maximum of 20 goals, so choose wisely. You can go back and edit your goals, but you can’t delete them. It seems weird, yes, but once a goal is there, it can only be edited.
That being said, you can completely “re-do” a goal, essentially “deleting” the past parameters and setting up something new.
But, this new goal won’t retroactively change data. So if you have a goal set around a page view then change it to a separate page view, you’re still going to see those old goals on past dates. Going forward, you’ll just see the new goals.
If you find yourself wanting more than 20 goals, then you will have to create additional properties to track those goals.
Once you click ‘add a new goal’, you’ll see that there are numerous options.
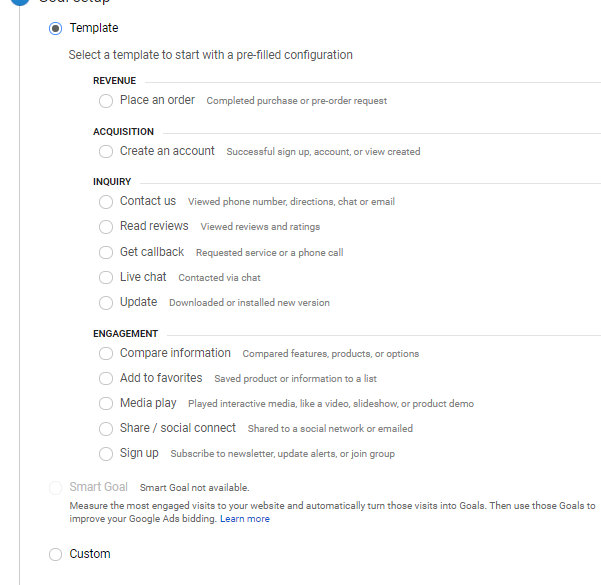
From here, it’s usually best to click the Custom option all the way at the bottom. From there, you can select a name and then a type of goal. You have the following four to choose from:
- Destination
- Duration
- Pages/Screens per session
- Event
You’ll also have to give the goal a name. It’s best to choose something that you can automatically recognize like “Contact Us Form Submitted”.
In fact, that’s usually one of the best goals to start with.
If you have a contact form, get a quote form, or something else where users are greeted by a ‘Thank You’ page, you can create a destination goal. That way, whenever users reach that ‘Thank You’ page, your Google Analytics will count that as a goal success.
Step 4: Set Up Site Search
If your website has a ‘search’ option, then users will be able to search for something on your website and find it quicker. While not necessary for smaller websites, it is an absolute must if you’ve got a website with thousands of pages.
If you don’t have a search option on your website, you can go ahead and skip this step.
With the site search option enabled, you’ll be able to find out what users are searching for on your site.
To set it up, head back to the admin dashboard and go to the rightmost column to look at your views. Click on views settings and look at the bottom.
![]()
Once you turn this on, you’ll be asked to enter your ‘Query Parameter’. The easiest way to find this is to make a search on your site and see what follows the URL.
![]()
In this case, the query parameter starts with ‘search’, so you would put ‘search’ in the box.
If you see that people are searching for a term that doesn’t bring them to any page, that could be a great idea for a content piece. Users are connecting some term with your site, but if they can’t find anything related, then they’ll just leave!
Step 5: Test Everything
Once you’ve got everything set up, you will want to test and make sure all your new settings are working correctly.
Note, however, that it usually takes Google Analytics 24-48 hours to start tracking everything. So whenever you’re finished, give it a day or two before coming back and testing.
The first test you’ll want to run is real-time testing to make sure you’re tracking someone visiting your website. Look at the left-hand column and select Realtime.
![]()
Once you click on Realtime, you’ll be presented with a dashboard. On a separate device (one where you’re not logged into your website or a different IP address), go to your website. Within a few seconds, you should see the number of users increase as well as information and where you’re viewing the website from.
You’re also going to want to check out your goals. So if you have a destination goal set up for the ‘Thank You’ page, go ahead and fill everything out. Once the goal is completed, it may take some time before showing up as a conversion. For brand-new goals, it can often take 24-48 hours before they’re recorded correctly so don’t freak out if you don’t see anything.
You can check that in the Conversions tab in the same lefthand column.
After going through these basic things, you’re finished! Now you can start tracking data and know more about your website’s visitors.
What About Google Analytics 4?
As of October 14, Google Analytics 4 is now the default option when making a property. You can still use the Universal Analytics property when tracking your sites as Google has not announced an end-life yet.
Google Analytics 4 comes with a bunch of handy new features, such as machine learning and improved data filters. It is far from necessary to implement, but in the coming years, all Google Analytics properties may turn into Google Analytics 4.
If you’re wanting to upgrade or not sure where to go with Google Analytics 4, we can help you with that. We can set up your account and ensure you’re tracking everything properly.
What About the Other Google Tools?
During setup, you might have seen a few other Google tools mentioned, such as:
- Google Search Console
- Google Tag Manager
- Google Ads (not a tool, but you probably saw it pop up)
Each of these are unique tools in their own right and when using properly, can help you better analyze data and track tools. If you do have a Google Ads campaign running, you’re going to want to make sure you have it linked to your Google Analytics account to properly track traffic and conversions.
Setting up and getting the most out of those tools can be difficult. We are experts in GSC, GTM, and Google Ads and can help you connect all those accounts and accurately track data and information with your website.
Conclusion
Even though the graphs, tabs, and various terms can be confusing at first, Google Analytics is pretty easy to understand at the basic level. It does have some pretty powerful and neat features we didn’t get into in this article, but we can help you take control of your Google tools.
As digital marketing and business intelligence leaders, we’ve been using Google Analytics for quite some time. We’ve worked with everyone from small businesses to enterprise-level companies. If you’re not sure how to set it up, want to upgrade to GA4, or need help understanding data, we can help. Reach out to us today for a project quote! We look forward to hearing from you.


